
Notifications
Clear all
Computers & IT
143
Posts
55
Users
28
Reactions
24.2 K
Views

Topic starter
Welcome to this forum thread related to my video showing how to recycle laptop motherboards into PCs!
Search terms, and where to get boards.
eBay is the best place to buy these boards, and there are many to choose from.
NEVER buy a board that’s ‘untested’ or ‘spares or repairs’. You will NOT be able to repair them so you will be wasting your money. Only buy boards from reputable sellers (look at their feedback rating), and make sure the listing explicitly says that the board is tested to be working. Also make sure that the seller accepts returns just in case you end up with a dud board.
Want a board with an Nvidia graphics card on it? Simply add ‘RTX’ to the search and it will capture a whole sweep of boards that have RTX GPUs. Look up benchmarks for the mobile versions of these cards before buying.
General board purchasing notes:
“On-board” pre-soldered RAM allows for the best value, as the memory can’t be used elsewhere so is cheaper than the inflated RAM prices at the moment. This applies to on-board discreet GPUs too.
Use reputable CPU benchmarking websites (like Passmark) to see if you’re getting good CPU performance for the money. Compare it to desktop CPUs, and look at the whole price comparison of not only a comparative desktop CPU but the motherboards available for it also.
Try and confirm before purchase the location of the power button on the laptop model you’re looking at. This will give you clues for how easy it’s going to be to trigger a boot – some laptops have separate power buttons, others have them on the keyboard membrane. Identify where the power button is first and evaluate whether you’re going to be able to get it into ‘booting’ state.
Prioritise boards that also have a heatsink cooler. These are sometimes listed separately by the sellers – a search is the only way to know. If a seller does have a heatsink cooler and a board you’d like, negotiate buying both together. This is good for the seller as they sell two things at once, and good for you as you can negotiate a good discount for the cooler. Make sure the fans are included too as these are annoying to ‘mod in’ manually (although it is perfectly possible if you’re up for it).
Also note that if you can’t find a cooler for a board you can still ‘diy’ your own cooler for it. I will be introducing this in my next video so stay tuned for further instructions, as this allows for even better ‘value extraction’.
I also recommend looking for boards with barrel power plugs. It’s just cheaper to buy old Dell/HP/Lenovo power adapters and mod them to work as I did. Boards that don’t have barrel plugs usually rely on USB-C for power – great for lower power boards (ones with on-board graphics specifically) but it can complicate things if they have a discreet GPU as USB-PD only goes up to 100w on most USB-C power supplies and docks etc.
Depending on what you need power wise, an old Thunderbolt USB hub is quite a fun thing to explore. If a board can be powered by USB-C, plugging it into a Thunderbolt hub (like a Dell WD19TB) will not only provide power to the board but give you a load of USB ports and display outputs – it basically converts it into a mini PC with a single cable.
Some new boards rely on the laptop’s original battery to retain CMOS/BIOS/Time settings. I only encountered this on an HP Omen motherboard. If you want to avoid annoying time resets and messages, look for a board with a visible cmos battery or make sure you keep it connected to power. Alternatively, source a replacement laptop battery and plug it in.
Power button notes:
Some motherboards have solder pads for power triggering near the keyboard connector - it's always worth looking for these first as it's a lot easier to connect to them compared to making a ribbon cable.
Also, some motherboards have 'daughter' boards with their power buttons on them. These are usually connected with smaller ribbon cables, so the method is the same - just on a different smaller connector. Have a look at images of the laptop your motherboard is from for clues as to how it's all connected together.

Looking at the EBay listings it seems like most of the motherboards(in Europe at least) come without the heatsink. I'm curious what's the best solution for those boards, especially the ones with TDP over 100?
Posted : 17/07/2026 12:49 pm

Love the video as I'm knee deep in sourcing parts for my Cyberdeck. Any chance you have a link for the motherboard you used?
I'm debating on sourcing a used gaming handheld motherboard, but it might be either more limited or more expensive than a laptop motherboard.
Posted : 17/07/2026 2:07 pm

I think I’d wanna try to do this but with a twist, 144/165hz 24’ display, get a board without the heatsink and make it watercooled. I think if I were to do this project I’ll make it like this as an AIO gaming PC
Posted : 17/07/2026 2:13 pm

Can you share any tips for finding a good video driver board for a recycled iMac display?
Posted : 17/07/2026 3:31 pm

I can't seem to find the display driver for the "Apple iMac 27" 5K Retina Screen" for approx. $50.
I can only find these in lower resolution, at this price point. Is the one you're using only sending you a 1440p signal to your 5k screen?
Posted : 17/07/2026 3:41 pm

Unfortunately it's the same for me, not a single board with heat sinks or fans, Cooper price must be up. Ill be keeping an eye out tho this project would be amazing for a "steam deck" alternative!
Always an exciting day setting a new diy perks vid!
Here's to 5 million!
Posted : 17/07/2026 3:48 pm
Topic starter
Here's a link to the iMac screen driver I got for those interested: https://www.aliexpress.com/item/1005006602936047.html
You need to make sure the model number matches before purchasing though.
Posted : 17/07/2026 4:06 pm

Just incredible video Matt!
I do have one question about the screen you removed the top screen from. Are there any possible problems exposing the raw lcd surface like you did in the video? I imagined you'd have to place a protective film or glass over that for some reason. If you don't I guess that's just better.
Lee
Posted : 17/07/2026 4:10 pm

I picked up a LCD panel from a DELL XPS 2720 all-in-one more than two years ago and still haven't managed to find a compatible controller board scooting the whole internet 😭 Even when ordering from a specialized seller on Taobao during my trip in China, the seller told me he adapted the firmware of a lm270wq1 panel controller to work with my lm270wq3-sla2 panel, yet still a black screen... so if anyone know how to make it work please let me know 😅
https://world.taobao.com/item/YWM3Nk1ab2dCUDd4Ti9PV08yRzg2UT09.htm
This post was modified 3 months ago by lemovision
Posted : 17/07/2026 4:11 pm

So you mentioned using DisplayPort capable USB-C instead of HDMI to get signal output during BIOS bootup, so if I have a DisplayPort will that take priority?
Posted : 17/07/2026 6:23 pm
Topic starter
YepSo you mentioned using DisplayPort capable USB-C instead of HDMI to get signal output during BIOS bootup, so if I have a DisplayPort will that take priority?
Posted : 17/07/2026 7:02 pm
Topic starter
As far as I can tell it's just a normal glossy LCD, so there shouldn't be any problems using it like this. LG made a screen themselves using the same panel without a different coating.Just incredible video Matt!
I do have one question about the screen you removed the top screen from. Are there any possible problems exposing the raw lcd surface like you did in the video? I imagined you'd have to place a protective film or glass over that for some reason. If you don't I guess that's just better.
Lee
Posted : 17/07/2026 7:03 pm
leemanga reacted

A lot of my projects that re-use old LCD screens suffer from HDMI ports that lie orthogonal to the PCB, which makes it hard to maintain a low profile. HDMI ports are delicate enough that removing and resoldering without damaging the board is difficult on my home bench.
Do you have any advice on finding alternative video driver PCBs, or modifying HDMI and Displayport ports to lie parallel to the PCB?
Posted : 17/07/2026 8:24 pm

out of curiosity are you able to share any links for finding the motherboards as I'm struggling to find on eBay, thanks
Posted : 17/07/2026 9:33 pm

Hi,
Nice video as always. I was browsing eBay looking at motherboard but I was wondering: Is there a chance that having the power delivery made through USB type-C be an issue or should it work like the jack you have in the video ?
If so, it kinda limits the choices.
Posted : 17/07/2026 10:26 pm

@diyperks i have been thinking about doing a project like this just with my old razer blade from 2016 but i was thinking about using som sort of thermal epoxy to do the job keeping the origional cooler just adding some extra cooling that way
Posted : 17/07/2026 11:19 pm

Do you think this is a viable option?
https://laptopmedia.com/review/lenovo-legion-5-15-review-playing-it-safe-but-still-delivering/
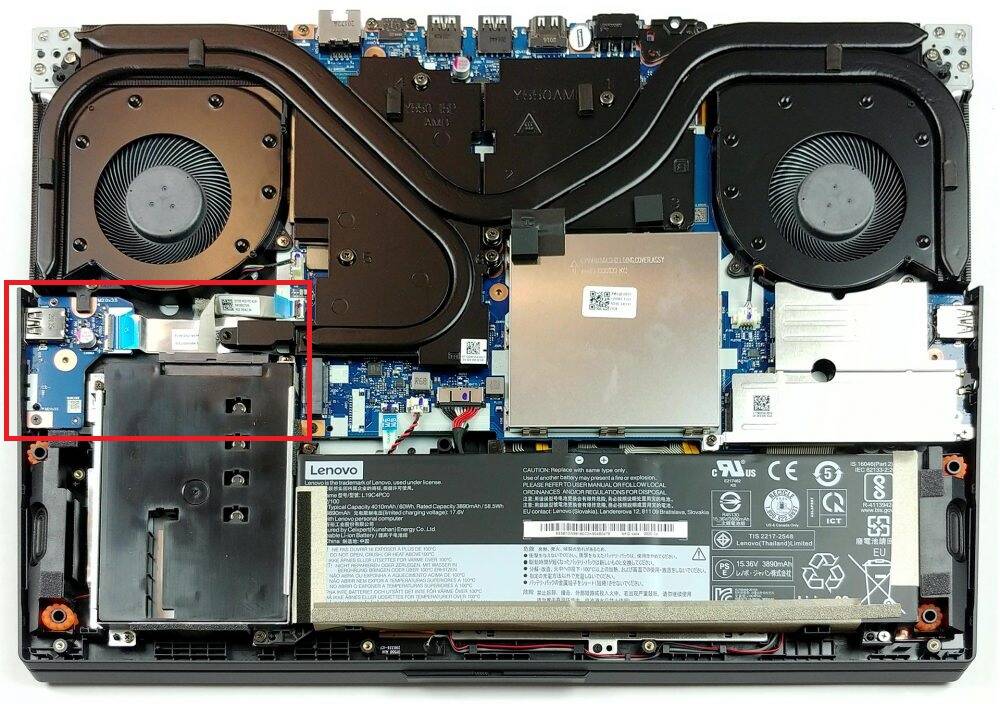
The problem with this one and I assume some other models is that there are other PCB sections that are connected with ribbon cables like the section I have highlighted in the picture and I'm fairly certain they won't be included when you purchase the MB
in the example it's just a USB port but how can you know that it will still work if it is absent? Thx in advance
Posted : 18/07/2026 6:02 am

Any thoughts on making use of a touch panel from a laptop? I've been looking for a while, but can't seem to find a means of resuing these, and it'd be such a cool DIY display for a magic mirror or a home automation dashboard or something!
Posted : 18/07/2026 6:10 am

Great video, Matt!
I noticed you explained searching for "RTX" to find Nvidia boards, but I was wondering what search terms you used to find the AMD motherboard you showed in the video. When I try searching for "Radeon" or "RX", I mostly end up with Mac replacement boards.
Also, have you experimented with adding extra case fans to improve cooling, or is the laptop heatsink already close to optimal? I'm curious whether additional airflow would make much difference or if it would just add unnecessary complexity.
Posted : 18/07/2026 7:15 am

@m90 the motherboard would not even know that the usb daughterboard exist, it's not like apple devices, where every component has a unique code which the device uses to identify whether the component is original or it exist or not. you can safely ignore the extra daughter board if you have usb ports already available.
Posted : 18/07/2026 11:02 am
i recently purchased an Asus TUF a15 board for 5$, the owner said the laptop boots into BIOS, but shuts down (maybe the GPU is dead, still the CPU should be powerful enough), which is GUESS is due to thermal protection, i changed the dried up thermal paste, but i have yet to test it out, as i dont have a DDR5 ram, if it worked then i have struck GOLD, almost. The specs are, Ryzen 7, RTX 3050ti. He is also selling the display for 30$, sadly it is only FHD 144Hz.
Posted : 18/07/2026 11:07 am
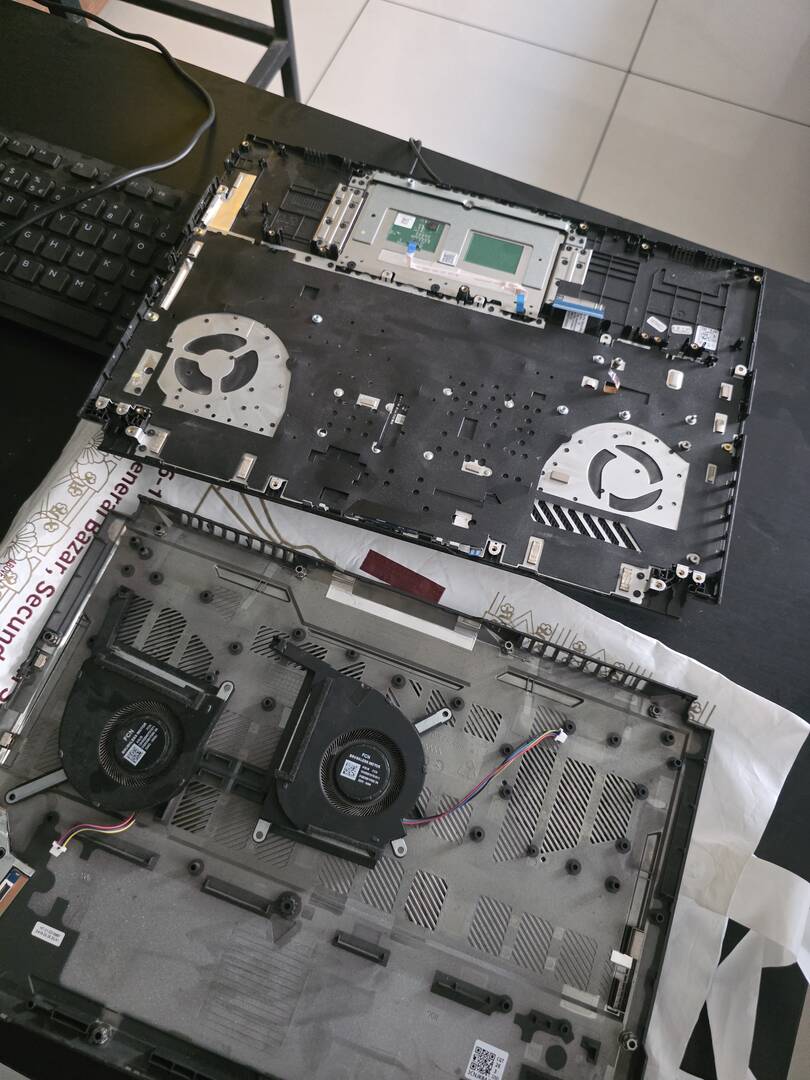
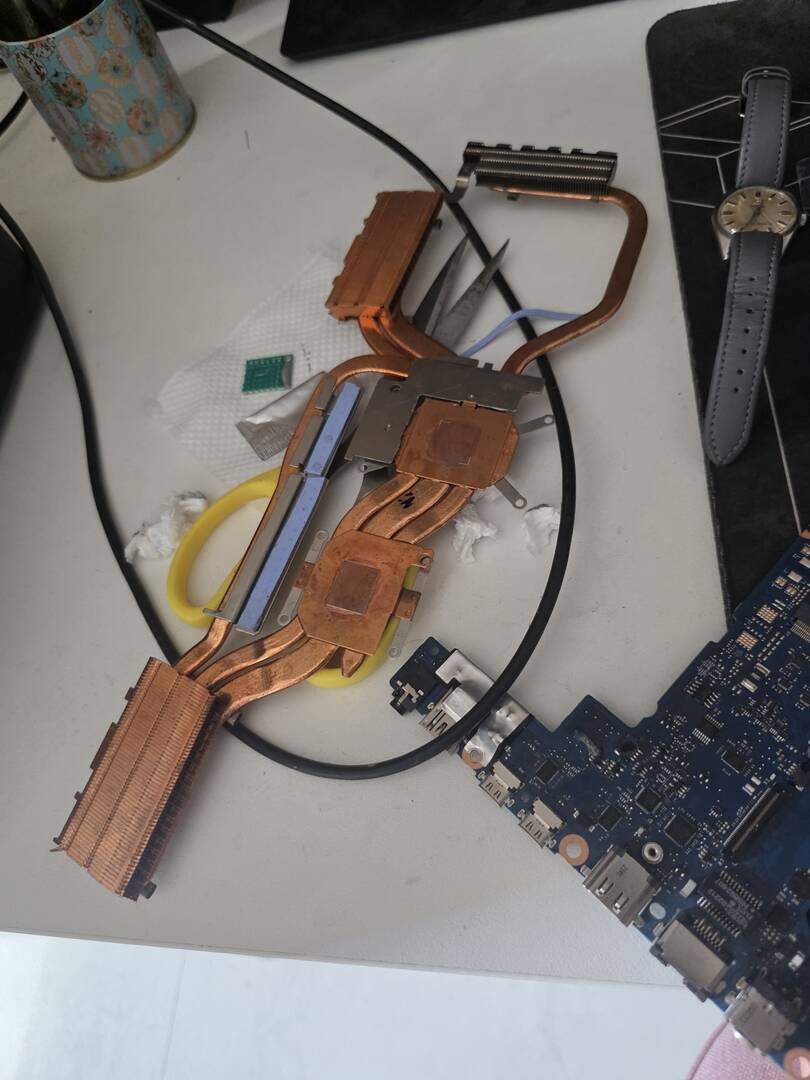
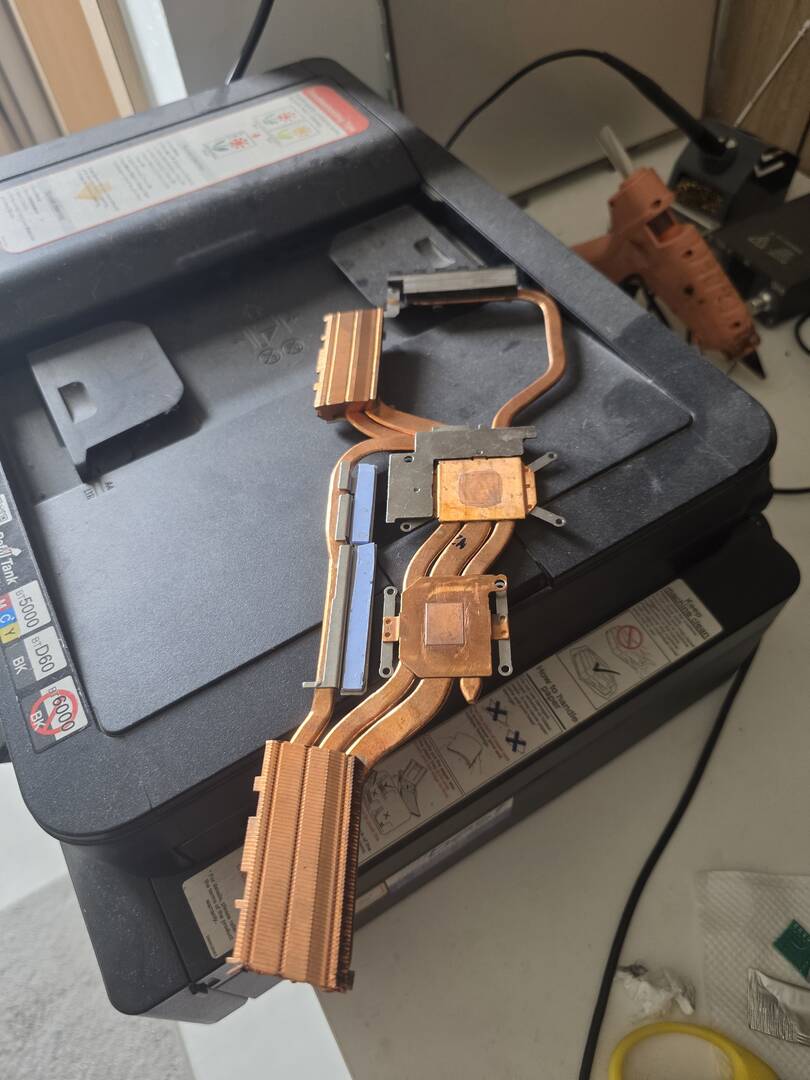
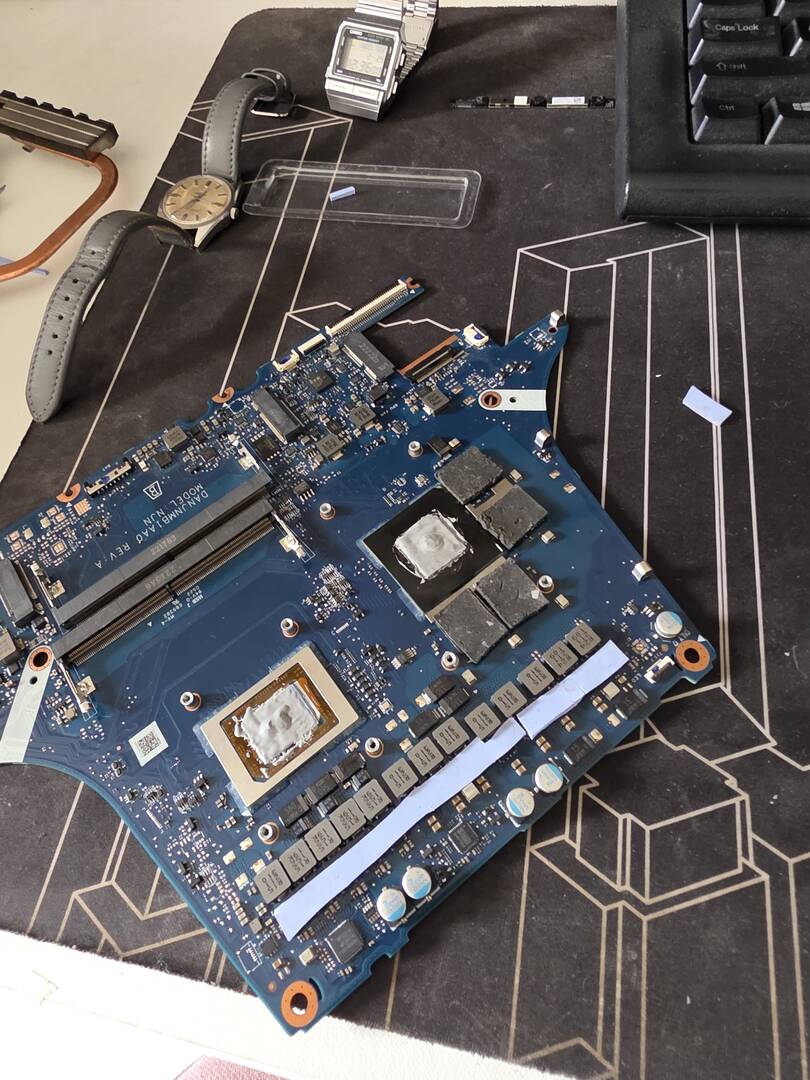
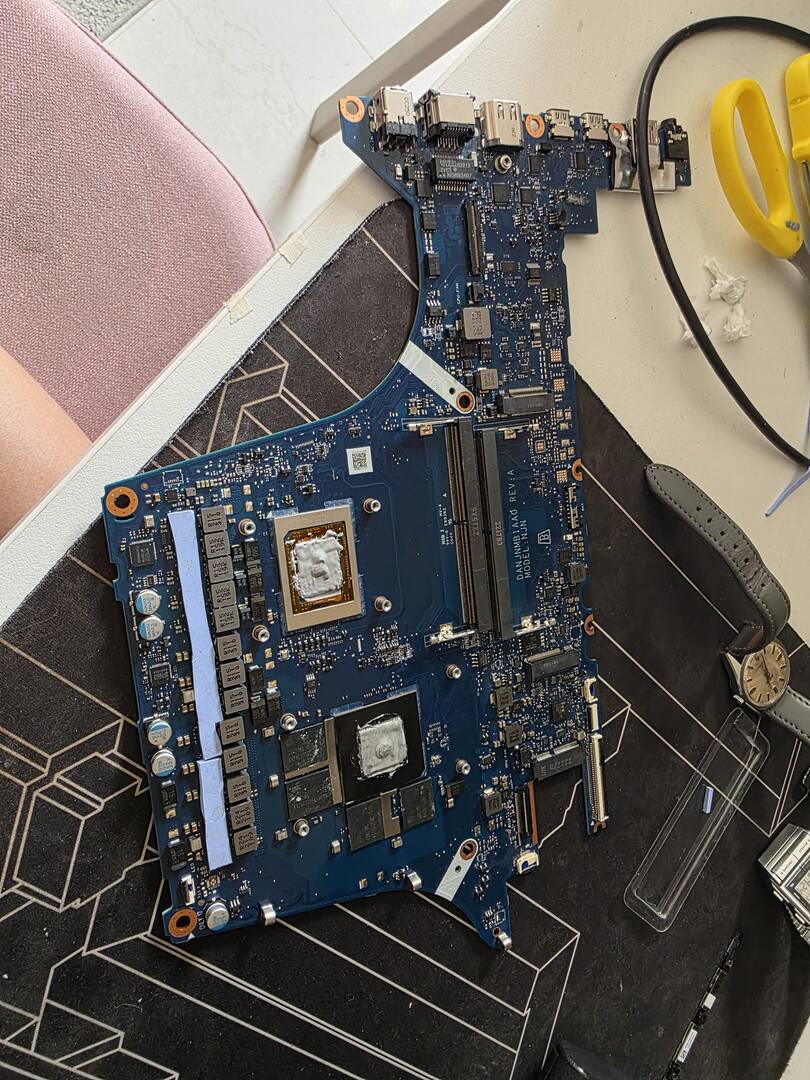
this is the board.
Posted : 18/07/2026 11:11 am

Bad luck--dead GPUs are, to say the least, extremely irritating. I have a 2009 MacBook Pro motherboard I've been trying to fix for a while, and I think it also has a dead GPU, which means no display for me to test with. I assume yours has an iGPU, though, otherwise you won't be able to get a display signal? Also I think 1080p 144hz is pretty good. 1080p is average, but 144hz is quite a respectable refresh rate.
This post was modified 3 months ago by Imp Inventor
My worktable is a site of frequent detonations. Please knock so I don't start a Lithium fire when you startle me.
Posted : 18/07/2026 1:05 pm
@imp-inventor yup it has igpu and dgpu, hopefully it was a thermal protection shutdown. You can get the motherboard for the macbook for cheap, or get a macbook with broken display and use its motherboard, you can keep the nob working motherboard for parts.
Posted : 18/07/2026 1:12 pm

This is a really cool idea!
I've been browsing Ebay and had very little luck finding a board that has a decently powerful gpu (aiming for 4070 which seems scarce!) as well as soldered RAM that isn't sold as a broken component.
Any tips for finding a good source? Or is it just a matter of keep my eyes peeled for something good to turn up?
Posted : 18/07/2026 1:33 pm

Great video, Matt!
I noticed you explained searching for "RTX" to find Nvidia boards, but I was wondering what search terms you used to find the AMD motherboard you showed in the video. When I try searching for "Radeon" or "RX", I mostly end up with Mac replacement boards.
Also, have you experimented with adding extra case fans to improve cooling, or is the laptop heatsink already close to optimal? I'm curious whether additional airflow would make much difference or if it would just add unnecessary complexity.
You're on the right path with the RX or Radeon. I'm not sure if eBay has the option to omit words when searching like a standard search engine. And depending on how you feel about it... AI chat bots that have web search capabilities (ChatGPT, Google Gemini, etc.) generally do a decent job especially if you specify it needs to be a non-Apple board.
Also the Ryzen AI HX/Max chips are probably something to find too. I'm looking for one of those also to see if I can make a better Steam Machine DIY style.
Posted : 18/07/2026 1:35 pm
FluxForge reacted
@muzammil17 Yeah I can get the motherboard for almost nothing because it's so old--but I'm fixing it because I have it lying around and it's something to do, not because it's part of a bigger project that I need it for. What's your reasoning behind thermal protection shutdown? Did the GPU area get really hot just before it shutdown?
My worktable is a site of frequent detonations. Please knock so I don't start a Lithium fire when you startle me.
Posted : 18/07/2026 1:36 pm
@imp-inventor the laptop shutsdown after a while, which I guess all modern laptops have to protect the gpu and cpu, i can't confirm whether the gpu works, unless I get the ram somehow and test it.
Posted : 18/07/2026 1:58 pm
Page 1 / 5
Next